
Solar Panels vs DIY in Fair Oaks: A Practical Guide
If you’re weighing solar panels vs diy in Fair Oaks, the real question is how much roof work, electrical work, paperwork, and risk you want to own personally. A solid plan makes the decision clearer because you can see what’s required, what can go wrong, and what you’ll need to keep on file when the job is done.
TL;DR: If you’re weighing solar panels vs diy in Fair Oaks, the real question is how much roof work, electrical work, paperwork, and risk you want to own personally. A solid plan makes the decision clearer because you can see what’s required, what can go wrong…
Quick checklist:
- Verify roof condition first; plan reroof timing before installing panels.
- Size the system from real kWh usage and shading, not just panel count.
- Compare inverter options (microinverters vs string + optimizers) and monitoring.
- Confirm permitting and utility interconnection responsibilities and timeline.
- Review the contract (warranties, production assumptions, exclusions, roof penetrations).
- Confirm any electrical panel upgrades and inspection steps.
This guide walks through scope decisions, materials and scheduling realities, quality checks, and how a licensed team typically supports homeowners, so you can choose the approach that fits your home and your comfort level.
TL;DR: DIY solar can work if you already have solid roofing and electrical experience, the right safety gear, and time to manage inspections. As a result, Most homeowners hire a licensed installer because roof penetrations and electrical tie-ins leave little room for guesswork. As a result, Either path goes smoother when you define the scope, layout, and documentation before you order equipment.
Quick Checklist (Before You Commit): For Solar Panels Vs DIY
- Confirm your roof has usable area with limited shading.
- Check the condition of the roof surface and plan for repairs first if needed.
- Look at your main electrical panel: space, also condition, and capacity for additions.
- Decide on battery backup now or a battery-ready setup for later.
- Choose an equipment location with working clearance (garage, exterior wall, or utility area).
- Clarify who will handle permits, inspections, and final utility approval to turn the system on.
What To Expect From A Licensed Team
| Decision | Why it matters | Quick check |
|---|---|---|
| Roof condition | Installing over an aging roof risks rework later. | Inspect first and plan reroof timing if needed. |
| System size | Determines cost and energy offset. | Size from real kWh usage and shading. |
| Inverter type | Affects monitoring and shade performance. | Compare microinverters vs string + optimizers. |
| Permits & interconnection | Approvals can drive the schedule. | Ask who handles permits/utility and expected timelines. |
When homeowners compare solar panels vs diy, they often focus on the hardware price. In addition, In practice, the bigger difference is responsibility: who designs the system, who touches the roof and electrical service, and who stands behind the work if something needs adjustment later.
A licensed team typically starts with a site assessment, confirms roof condition and electrical capacity, builds a clear scope, and coordinates the paperwork and inspections tied to a code-compliant installation. For this reason, DIY means you manage those pieces yourself, or you hire separate specialists and still coordinate the whole job.
The Practical Differences
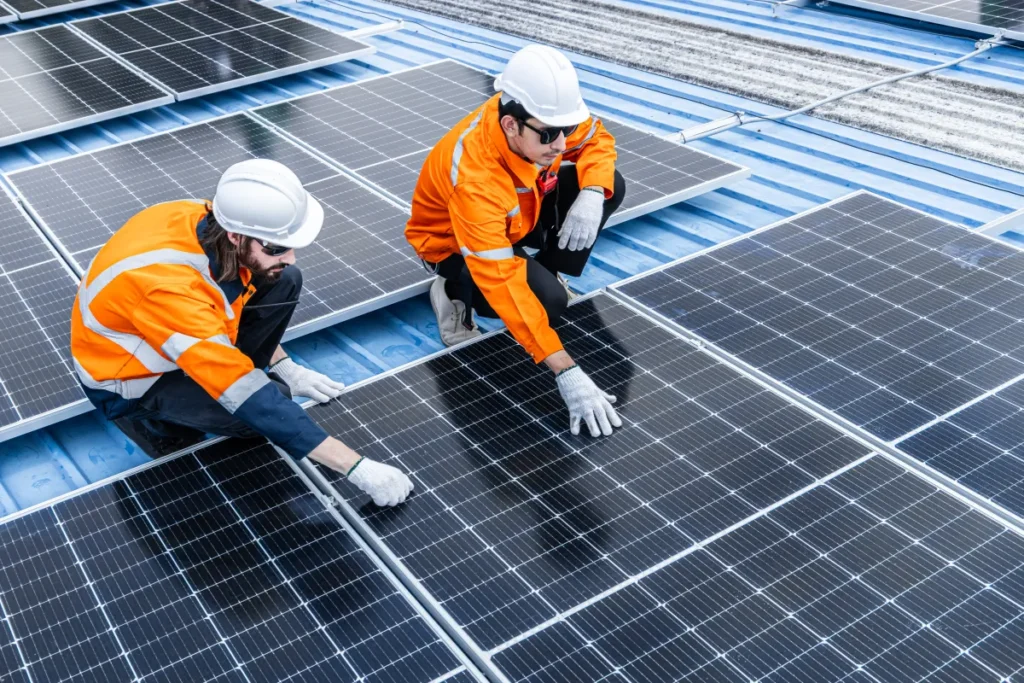
- Safety planning: fall protection, ladder setup, and electrical lockout practices.
- Roof penetrations: locating structure, drilling, flashing, and watertight sealing.
- Electrical integration: breaker space, labeling, shutoffs, and code-ready workmanship.
- Drawings and documentation: equipment specs, layout, and as-built records for your files.
- Scheduling: coordinating deliveries, inspections, and any needed roof or electrical prep.
- Accountability: one contractor responsible for the finished system, not a chain of vendors.
Common Mistakes That Turn DIY Into Rework
- Buying equipment before confirming roof condition, shading, and electrical panel capacity.
- Routing conduit or wiring in a way that looks “fine” but fails inspection or creates future service headaches.
- Underestimating how long roof penetrations and sealing take when you do it carefully.
- Skipping an equipment location plan, then losing garage/storage space or blocking service clearances.
- Mixing components without a clear compatibility plan and written warranty coverage.
- Not keeping photos and serial numbers, which makes future troubleshooting and resale harder.
- Treating permits and inspections as an afterthought instead of part of the schedule.
Planning And Scope Decisions
Good planning keeps you from spending money twice. Additionally, Even if you’re leaning DIY, a professional-style scope review helps you spot the “hidden” work, such as roof prep, electrical upgrades, and equipment placement, that drives most delays.
Scope Choices That Affect Cost And Schedule
- Roof readiness: repairs or replacement should happen before panels go on, not after.
- Main panel condition: older or crowded panels may need upgrades to support a safe tie-in.
- Battery backup: installing now vs leaving a clean path for a future battery-ready setup.
- Detached structures: garages and ADUs can add trenching or longer wire runs.
- Future loads: EV charging or HVAC upgrades can change system sizing decisions.
- Access and aesthetics: where you place visible conduit and equipment matters long-term.
Small-Roof Layout Strategies (When Space Is Tight)
Some homes in Fair Oaks have limited roof area once you account for vents, ridges, and shaded zones. Overall, Instead of forcing panels wherever they fit, treat layout as a design problem: maximize usable space, protect roof function, and keep service access in mind.
- Prioritize clear, unshaded zones over squeezing panels into awkward corners.
- Keep pathways for future roof maintenance, especially near common service areas like vents.
- Choose a layout that minimizes roof penetrations and avoids complicated flashing details.
- Ask for a plan that shows clearances so you can visualize the final look.
- Confirm how the layout affects where conduit and equipment will land on the exterior.
Equipment Placement And Storage Planning
Solar isn’t only “on the roof.” Most systems also include equipment on a wall near your electrical service. For example, Planning that location early helps you keep garage storage usable and prevents surprises during installation.
- Pick a location with working clearance and ventilation, not squeezed behind shelving.
- Keep pathways clear for shutoff access and future service visits.
- Plan for neat conduit routing so the exterior looks intentional, not patched together.
- If you want batteries later, reserve wall space and a clean wiring path now.
- Protect equipment from sprinklers, impacts, and routine clutter.
If you’re coordinating solar with other home upgrades, it helps to align scopes and scheduling across trades. Meanwhile, You can see the services we handle at US Construction & Remodeling Corp..

Materials, Permits, And Scheduling For Solar Panels Vs DIY
Materials matter, but workmanship and documentation matter just as much. Also, No matter which way you lean on solar panels vs diy, the goal stays the same: a system that stays watertight, passes inspections, and remains serviceable years from now.
Materials And Workmanship Details To Look For
- Racking and fasteners: corrosion-resistant hardware and a layout that matches roof structure.
- Flashing and sealing: roof penetrations detailed to shed water, not rely on caulk alone.
- Wire management: clean routing, protected runs, and UV-rated components where exposed.
- Conduit runs: straight, supported paths that avoid sharp bends and look finished.
- Electrical labeling: clear shutoff and circuit identification for emergency response and service.
- Grounding: done cleanly and consistently across roof and electrical components.
- Weather exposure: equipment placed and protected based on sun, water, and impact risk.
- Documentation: manufacturer cut sheets, photos, and a simple system map for your files.
Fair Oaks Permitting Touchpoints (Sacramento County)
Fair Oaks is largely unincorporated, so many residential solar installs route through Sacramento County’s building permit and inspection process, often with electronic plan submittal. Additionally, Because jurisdiction can vary by address and scope, confirm early who the authority is and what documents they’ll expect so your schedule stays realistic.
Even when you plan DIY, you’ll still need to coordinate inspections and keep a clean paper trail. Overall, A licensed contractor can take ownership of those coordination steps as part of the contracted scope.
Typical Fair Oaks Project Steps (From Planning To Turn-On)
- Site review: evaluate roof condition, shading, and the electrical service location.
- Scope definition: confirm goals (offset, future EV, backup needs) and equipment placement.
- Plan prep: finalize layout drawings and equipment specifications needed for submittals.
- Permit submittal: submit documents and respond to plan review comments, if applicable.
- Installation scheduling: order materials, set dates, and coordinate any roof or electrical prep work.
- On-site install: mount racking/panels, run wiring/conduit, complete electrical tie-in and labeling.
- Inspection and activation: complete required inspections and finalize utility approval to operate.
Budget Ranges And Timeline (Typical)
- Biggest cost drivers: roof complexity, electrical panel work, array size, and whether you add battery backup.
- Schedule reality: paperwork and inspections often take longer than the physical installation; build in buffer time.
- Compare apples to apples: insist on an itemized scope that shows roof details, electrical scope, and closeout documents.
- Plan for contingencies: damaged decking, unexpected electrical issues, and roof repairs can shift dates.
Decision Snapshot (What Changes Cost And Schedule)
| Decision area | What can change | What to confirm up front |
|---|---|---|
| Roof condition | Repairs or replacement before mounting | Who handles roof prep and who warrants penetrations |
| Main electrical panel | Upgrades or rework if capacity is limited | Scope for panel work, labeling, and shutoffs |
| Array layout | Fewer panels if shading or obstructions exist | Final layout drawing and a clear conduit path |
| Equipment location | More conduit and labor if far from service | Wall space, clearances, and impact protection |
| Inspections | Schedule shifts based on availability | Who coordinates and what documents you’ll receive |
Quality Checks And Closeout
The best installs look clean, pass inspection without drama, and come with documentation you can actually use. For this reason, Treat closeout as part of the project, not a last-minute email.
Quality Checks You Can Verify Before Sign-Off
- Roof penetrations look properly flashed and sealed, with no “smears” of patchwork caulk.
- Panels sit straight and evenly spaced, with consistent edge alignment.
- Conduit runs look neat, supported, and protected; nothing dangles or rubs.
- Electrical labeling is clear and placed where a homeowner or responder can find it quickly.
- Equipment mounting looks solid and level, with appropriate clearances around it.
- System startup includes a walkthrough of shutoffs and what normal operation looks like.
- You receive photos and serial numbers so future service calls stay simple.
Maintenance Tips After Installation
- Check system alerts and performance trends periodically; a small issue caught early is easier to fix.
- Keep panels clear of heavy debris; avoid roof access unless you have proper safety gear.
- Trim vegetation that may grow into shading zones over time.
- After big storms, do a ground-level visual check for obvious damage or loose wiring.
- Keep the equipment area unobstructed so shutoffs remain accessible.
- Save all manuals and warranty documents in one folder (digital and/or paper).
Closeout Documents That Protect You
- Final inspection sign-off (when applicable) and a copy of the approved plans.
- A simple one-page system map that shows major components and shutoff locations.
- Manufacturer warranties and installer workmanship terms in writing.
- Serial numbers, photos of key installations, and commissioning notes.
- Clear instructions for how to request service and what information to provide.
- A list of any homeowner responsibilities (cleaning, access, vegetation management).

Serving Homeowners In Fair Oaks
US Construction & Remodeling Corp. As a result, helps Fair Oaks homeowners sort out solar panels vs diy by defining scope early, setting a realistic schedule, and delivering a code-ready installation with a documented closeout package. For this reason, You’ll know what’s included, what’s optional, and what needs to happen before inspection day.
Book a planning call to talk timeline and next steps; we’ll review your roof, electrical setup, and preferred equipment placement.
Trust And Accountability Checklist
- Licensing and insurance: ask for current proof appropriate to the scope of work.
- Permit responsibility: confirm in writing who submits documents, schedules inspections, and responds to plan review comments.
- Clear communication: agree on how updates happen (text, email, calls) and how change orders are approved.
- Workmanship verification: request photos of roof penetrations and concealed runs before they get covered.
- Clean jobsite standards: confirm daily cleanup and protection of landscaping and walkways.
- Closeout package: make sure you receive plans, serial numbers, and warranty paperwork at completion.
Keep It Simple
Solar can make a home more attractive, but buyers and lenders usually care about ownership, documentation, and whether the system looks professionally integrated. For example, The easiest way to protect resale value is to keep the paper trail clean and avoid “mystery work” that nobody can verify later.
- Keep proof the system was installed and inspected per local rules.
- Store warranties, manuals, and a basic system map with your home records.
- If you add batteries later, update documentation so the configuration stays clear.
- Maintain unobstructed access to shutoffs and equipment; future buyers notice.
- When comparing quotes, value watertight roof details and clean electrical work over bargain shortcuts.
Want a straightforward plan without guesswork? In addition, Call US Construction & Remodeling Corp. For example, at +1 (916) 234-6696 or use the booking link to lock in a planning call time that fits your schedule.
Helpful Links
Frequently Asked Questions
Most projects have two clocks: the on-site work and the paperwork and inspection calendar. A straightforward roof install can move quickly once materials arrive, while plan review, inspections, and utility approval can extend the overall timeline.
- Confirm roof and electrical scope early so you don’t pause mid-job.
- Build in buffer time for inspections, especially if you’re coordinating other upgrades.
- If you want a timeline specific to your home, use a planning call to map the steps.
The biggest differences usually come from labor, tools and safety equipment, and the risk of rework. DIY can reduce labor costs, but a licensed team often prevents costly mistakes around roof sealing, electrical integration, and inspection readiness.
- Roof complexity and penetration detailing
- Main electrical panel work or upgrades
- Equipment placement distance from the service
- Documentation, warranties, and closeout support
Often, yes. Fair Oaks is largely unincorporated, so many projects go through Sacramento County; however, the exact steps depend on your address and the scope of work. Before you buy equipment, confirm the local authority and what documents you’ll need to submit.
If you hire us, we can outline permit and inspection coordination in the written scope so responsibilities are clear.
Focus on the parts that keep the roof watertight and the electrical work serviceable. High-quality components matter, but clean installation details matter just as much.
- Proper flashing and sealing at every roof penetration
- Corrosion-resistant racking and fasteners
- Neat, protected wire routing and supported conduit runs
- Clear labeling and accessible shutoffs
- Complete documentation (manuals, serial numbers, photos)
It can. Buyers typically look for professional workmanship, clear documentation, and proof the system was inspected per local rules. DIY work that looks improvised or lacks paperwork can raise questions during a sale.
- Keep plans, inspection sign-offs, and warranty documents together.
- Take photos during installation to document what’s behind walls and conduit.
- Make sure equipment and shutoffs remain accessible and clearly labeled.
Ask questions that reveal scope clarity and accountability. You want a contractor who can explain the plan, put responsibilities in writing, and deliver a clean closeout package.
- What is included in the electrical scope (and what is excluded)?
- Who coordinates permits, inspections, and any plan review comments?
- How will roof penetrations be flashed and warranted?
- What documentation do I receive at completion?
- Who is my point of contact for schedule changes?
To compare options with a clear timeline, book a planning call at Free estimate or call +1 (916) 234-6696.
Licensed, insured & trusted local contractor
US Construction & Remodeling Corp.
4424 Freeport Blvd, Sacramento, CA, 95822
Phone: +1 (916) 234-6696
CSLB License #: 1117562 Fully licensed and insured.