Skip links

Bathroom Inspo You Can Build: A California Remodel Guide

If you're saving bathroom inspo screenshots and wondering what will actually work in a real home, this guide turns ideas into a buildable plan for California homeowners. It focuses on layout, materials, and the practical details that keep the finished space looking sharp.

TL;DR: Choose a layout that fits your plumbing and clearances, then lock in durable finishes and lighting early so the build has fewer surprises. Use the quick checklist below to organize your ideas before you request pricing.

  • Measure the room and note door swing, windows, and ceiling height.
  • Decide whether you will keep plumbing where it is or relocate fixtures.
  • Pick shower vs. tub priorities and the storage you need every day.
  • Select 2-3 reference photos for tile, vanity, and fixture finish.
  • Plan ventilation and layered lighting upgrades (ambient, task, accent).
  • Ask how permits and inspections apply to your exact scope.

What To Expect From A Licensed Team For Bathroom Inspo

DecisionWhy it mattersQuick check
Wet-area finishesWet zones need durable, easy-clean surfaces.Choose materials rated for bathrooms and simple maintenance.
VentilationHelps prevent humidity and long-term damage.Confirm fan sizing and vent routing.
LayoutGood layout improves daily usability.Verify clearances and door swings.
Budget controlKeeps scope creep from blowing up the price.Use allowances and a written change-order process.
  • A single statement surface: large-format porcelain tile on the main shower wall with a simple grout color.
  • Frameless (or low-iron) glass to keep sightlines open and show off tile work.
  • Built-in shower niches placed for real reach, also plus a small footrest if you shave.
  • A vanity with deep drawers for daily items instead of lower doors that become clutter zones.
  • A recessed medicine cabinet to add storage without crowding the countertop.
  • A clear plan for the vanity top: quartz, granite, solid surface, or porcelain, paired with the right backsplash height.
  • One primary metal finish and one accent finish so fixtures and hardware look intentional.
  • Lighting layers that flatter: ambient ceiling light, vanity task lighting, and a dim night-light option.
  • Comfort upgrades that feel subtle: heated floors, a quieter bath fan, and soft-close hardware.
  • A door strategy that frees space: outswing hinge, pocket door, or sliding door where it makes sense.

When you work with a licensed contractor, you should expect a quick reality check on structure, waterproofing, electrical clearances, and product lead times before anyone orders finishes. In addition, That pre-planning protects your walk-in shower remodel, vanity replacement, and tile installation from last-minute compromises.

Keep your bathroom inspo board focused on a few anchor choices (shower style, vanity look, and flooring). For this reason, Once those are decided, matching mirrors, lighting, and storage details becomes much easier.

floating vanity a large modern bathroom with two sinks an vanity

Planning And Scope Decisions For Bathroom Inspo

Great inspiration gets expensive when the scope stays vague. As a result, Nail down what changes (and what stays) before you fall in love with a tile pattern: fixture locations, plumbing walls, electrical, storage, and how the room is used on busy mornings.

Choose Your Flow

In bathrooms, a galley layout runs fixtures along two longer walls and works well when you keep the main plumbing wall intact. An L-shape layout (for example, vanity on one wall and shower on the next) can open up the entry path. Also, A U-shape layout wraps three sides and fits larger rooms with more storage. For example, If you have the square footage, an island-centered layout can place a freestanding tub or furniture-style vanity as the focal point, with circulation around it.

  • Keep plumbing where it is when you want the most value for the least disruption.
  • Relocate fixtures only when the new layout solves a real problem, like clearance or access.
  • Confirm door and shower-glass swing so you do not block drawers or towel bars.
  • Plan grab-bar backing and niches now, even if you add hardware later.
  • Decide where you want outlets, switches, and mirror lighting before tile begins.

Small Bathroom Layouts That Feel Open

Tight bathrooms can still look high-end when every inch has a job. Meanwhile, These moves keep the room from feeling boxed in.

  • Swap a bulky vanity for a narrower model with drawers and a tall mirror.
  • Use a clear glass panel instead of a framed enclosure when the layout allows.
  • Run the same floor tile into the shower (with the right slope and waterproofing) for continuity.
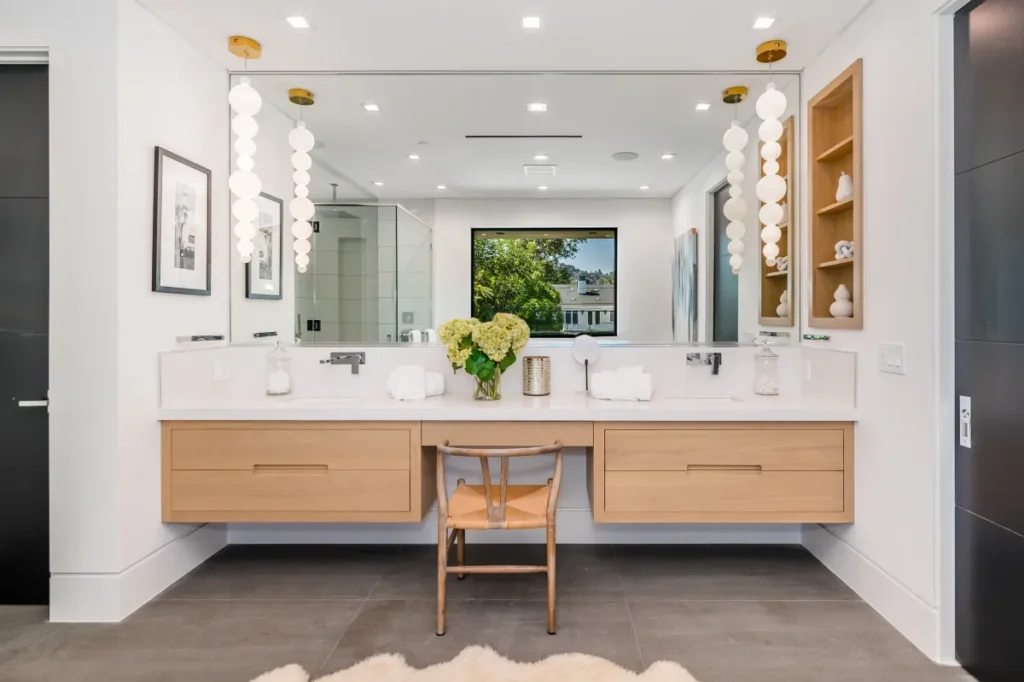
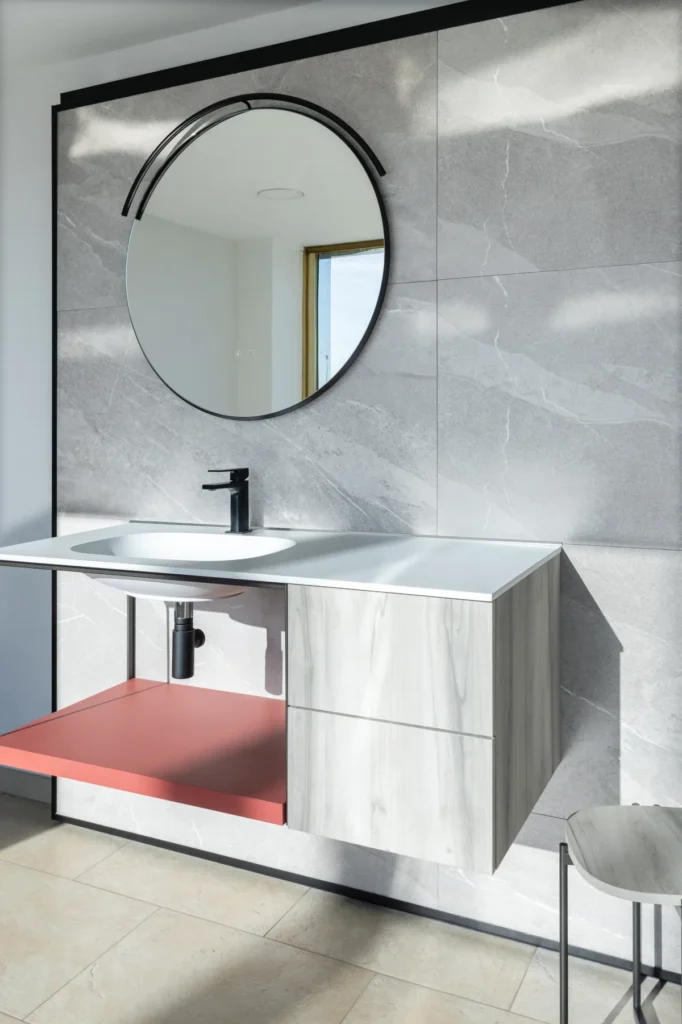
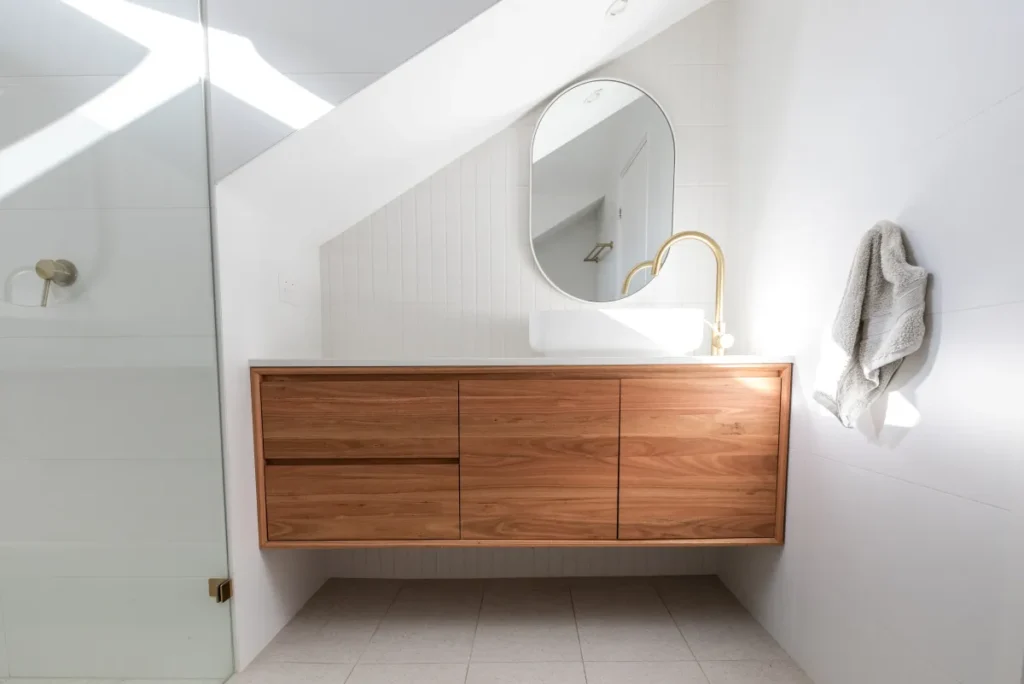
  • Choose a wall-hung or furniture-leg vanity to show more floor area.
  • Move to a pocket door or outswing door to reclaim clearance near the vanity.
  • Build storage into the wall: recessed cabinet, niche, or between-stud shelving.

Storage Moves That Reduce Clutter

Storage is where a bathroom goes from pretty to usable. Overall, Aim for hidden, easy-reach organization instead of open shelves that collect dust.

  • Deep drawer bases with dividers for hair tools, skincare, and backups.
  • A mirrored medicine cabinet with adjustable shelves for everyday items.
  • A slim linen tower (or stacked cabinets) for towels in shared bathrooms.
  • Shower niches for bottles, plus a second niche for razors or soap.
  • Toe-kick drawers or pull-out hampers in larger vanities.
  • Hooks behind the door for robes and towels when wall space is limited.

Materials And Lighting Choices To Lock In Early

This is where bathroom inspo becomes a real specification. Additionally, Pick materials that match how the room is used, not just how it photographs.

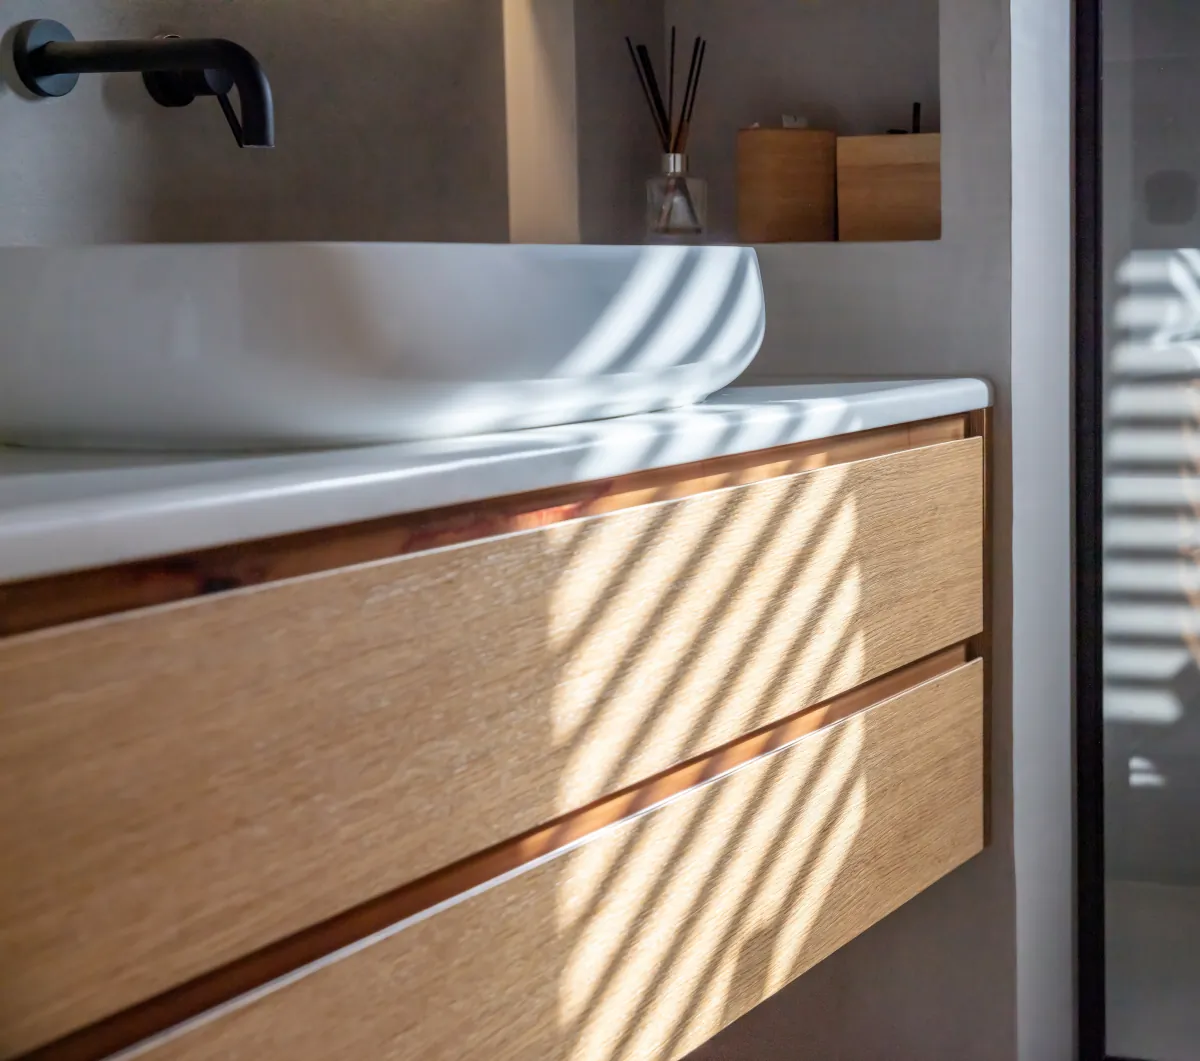
  • Vanity door styles: Shaker doors read classic, slab doors feel modern, and recessed-panel doors split the difference.
  • Countertop options: Quartz is consistent and low-porosity, granite is natural and varied, solid surface can be seamless, and porcelain slabs stay sleek with thin profiles.
  • Flooring choices: Porcelain tile offers durability and slip-resistant options; natural stone can look premium but needs the right care; LVP works in some bathrooms when installed correctly; sheet vinyl can be practical in secondary baths.
  • Layered lighting: Combine ambient ceiling light, vanity task lighting at face height, and accent lighting (like a niche light or toe-kick glow) on separate switches.
  • Color and contrast: Keep the main surfaces calm, then add contrast with hardware, mirrors, or one feature wall.
  • Glass and hardware: A simple handle set and clean glass details often look more expensive than ornate patterns.

Decision Snapshot (Quick Table)

DecisionCommon optionsOften changes budget/time
LayoutKeep fixtures vs. relocateRelocations add plumbing and inspection steps
Shower buildPrefabricated pan vs. full tileFull tile adds waterproofing and install time
Tile coverageWainscot vs. full-heightMore coverage means more labor and material
VanityStock vs. semi-customCustom sizing can extend lead times
LightingReplace fixture vs. add layersExtra circuits and dimmers add electrical work

Hypothetical Before-And-After Walk-Through

Hypothetical example: A dated hall bath has a tub/shower combo, a small vanity with little storage, and a single ceiling light that casts shadows. For example, The homeowner wants a cleaner look and better function without moving plumbing.

The updated plan keeps the toilet and drain locations, replaces the vanity with a drawer base, adds a recessed medicine cabinet, and installs a brighter mirror light paired with a softer overhead ambient fixture. As a result, In the wet area, the tub becomes a walk-in shower with a simple glass panel and a built-in niche. The result still matches the inspiration photos, but it stays grounded in real clearances and build details.

floating vanity bathroom sink basin and faucet modern interior des

Materials, Permits, And Scheduling

US Construction & Remodeling Corp. Meanwhile, helps homeowners in Sacramento and across California turn bathroom inspo into a scope you can actually build, from layout options to finish selections and permit coordination when your project requires it.

Schedule a free estimate online to review your inspiration board and get a written plan for the work. Prefer to talk it through? Call +1 (916) 234-6696.

Choose Durability On Purpose

Bathrooms are hard-working spaces. As a result, The right materials keep the room looking good and reduce issues like swelling, staining, or leaks.

  • Vanity cabinets: Plywood boxes handle moisture swings better than low-grade particleboard. For example, For doors and drawer fronts, thermofoil can be easy to wipe down, while painted finishes offer more color flexibility.
  • Countertops: Quartz stays consistent and resists staining; granite brings natural variation; solid surface allows integrated sinks; porcelain slabs offer a sleek look with strong heat resistance.
  • Tile: Porcelain performs well for floors and showers. In addition, Smaller mosaics can add grip on shower floors, while large-format walls create a calmer look with fewer grout lines.
  • Fixtures: Choose a quality shower valve (pressure-balance or thermostatic) and match all trims to the same finish family so replacements look consistent later.
  • Glass: Simple, clean glass details often age better than heavy frames, especially in smaller bathrooms.

Avoid Last-Minute Stops

Many bathroom upgrades are straightforward, but some changes can trigger permit and inspection requirements. Also, Moving plumbing, adding new electrical circuits, changing walls, or altering ventilation and windows are common examples. Requirements vary by city and county, so a good plan includes a permit check before demolition.

Scheduling matters just as much as design. As a result, Custom vanities, specialty tile, and shower glass can affect lead times, so confirm what is in stock before you lock the schedule.

Remodel Sequence, Step By Step

  1. Site visit, measurements, and a quick feasibility review of your inspiration.
  2. Scope definition: layout, fixture list, tile plan, lighting plan, and finish levels.
  3. Permit check (and submittal if required), then ordering long-lead items.
  4. Protection and demolition, followed by framing and rough plumbing/electrical.
  5. Waterproofing, then tile, paint, cabinetry, tops, and fixture set.
  6. Trim, hardware, punch list, and final inspection sign-off where applicable.

Estimate Options That Fit Your Schedule

  • Book online for the fastest start and upload photos, measurements, or inspiration links.
  • Call if you want to talk through layout constraints before selecting finishes.
  • If you are still collecting ideas, bring 3-5 images and we will help you narrow to a buildable direction.

Budget Ranges And Timeline (Typical)

  • Design and selections: often 1-2 weeks, depending on how quickly decisions are made.
  • On-site work: commonly a few weeks for many full remodels; larger scope and inspections extend it.
  • Layout changes, custom cabinetry, and custom glass can add calendar time.
  • Permits (when required) add review and inspection steps; timing varies by jurisdiction.

Frequently Asked Questions

Start by separating the look you want from the work you actually need. A realistic scope is a list of decisions, not just a mood board.

  • Measure the room and mark doors, windows, and plumbing walls.
  • Choose what stays vs. what moves (toilet, shower/tub, vanity).
  • Pick 3-5 must-haves, then 3 nice-to-haves.
  • Decide your finish level for tile, vanity, glass, and fixtures.
  • Ask for a written scope with model numbers before you compare bids.

Sometimes. Many like-for-like replacements do not, but changes to plumbing, electrical, walls, windows, or ventilation often do. Rules vary by local building department, so confirm your exact scope before demo.

  • Common permit triggers: relocating plumbing, adding circuits, moving walls, new windows, major shower conversions.
  • When permits apply, plan for inspections at rough-in and final stages.

Cost usually follows complexity. The biggest drivers are the items that add labor, coordination, or specialized trades.

  • Changing the layout and moving plumbing or electrical.
  • Custom cabinetry, specialty countertops, and custom glass.
  • Waterproofing details and the amount of tile coverage.
  • Upgrading lighting, ventilation, and electrical capacity.
  • Permit, plan review, and inspection requirements (when applicable).

On-site work often takes a few weeks for many full remodels, but calendar time depends on selections, ordering, and any permit review. A clear scope and early material decisions keep the schedule moving.

  • Fast refresh: paint, fixtures, and minor updates.
  • Full remodel: demolition through finish work, plus inspection windows when required.
  • Custom items: vanities and shower glass can add lead time.

Look for materials that handle water and cleaning without drama.

  • Porcelain tile: Durable, many slip-resistant options, great for showers and floors.
  • Solid-surface wall panels: Fewer seams and a smoother cleaning routine than many tile layouts.
  • Acrylic or fiberglass surrounds: A straightforward option for secondary baths.
  • Quartz vanity tops: Low-porosity and consistent appearance.

Whatever you choose, the waterproofing system behind it matters as much as the finish you see.

Focus on verification and clarity. A good contractor can explain the plan in plain language and put it in writing.

  • Verify licensing status and ask for proof of current insurance.
  • Make sure the scope lists materials, brands, and model numbers.
  • Ask who manages permits and inspection scheduling if your scope needs them.
  • Confirm how change requests are priced and approved.
  • Ask how the site will be protected and cleaned during the job.

Leave a comment

This website uses cookies to improve your web experience.
Explore
Drag