Materials And Finish Selections
US Construction & Remodeling Corp. Additionally, helps California homeowners compare flooring options, plan the prep work, and install finishes that stand up to real water exposure. Additionally, We review the existing floor, flag subfloor or moisture issues early, and provide a straightforward plan you can approve before work starts.
Free estimate to get material recommendations and an installation plan tailored to your bathroom.
Practical Pros And Cons
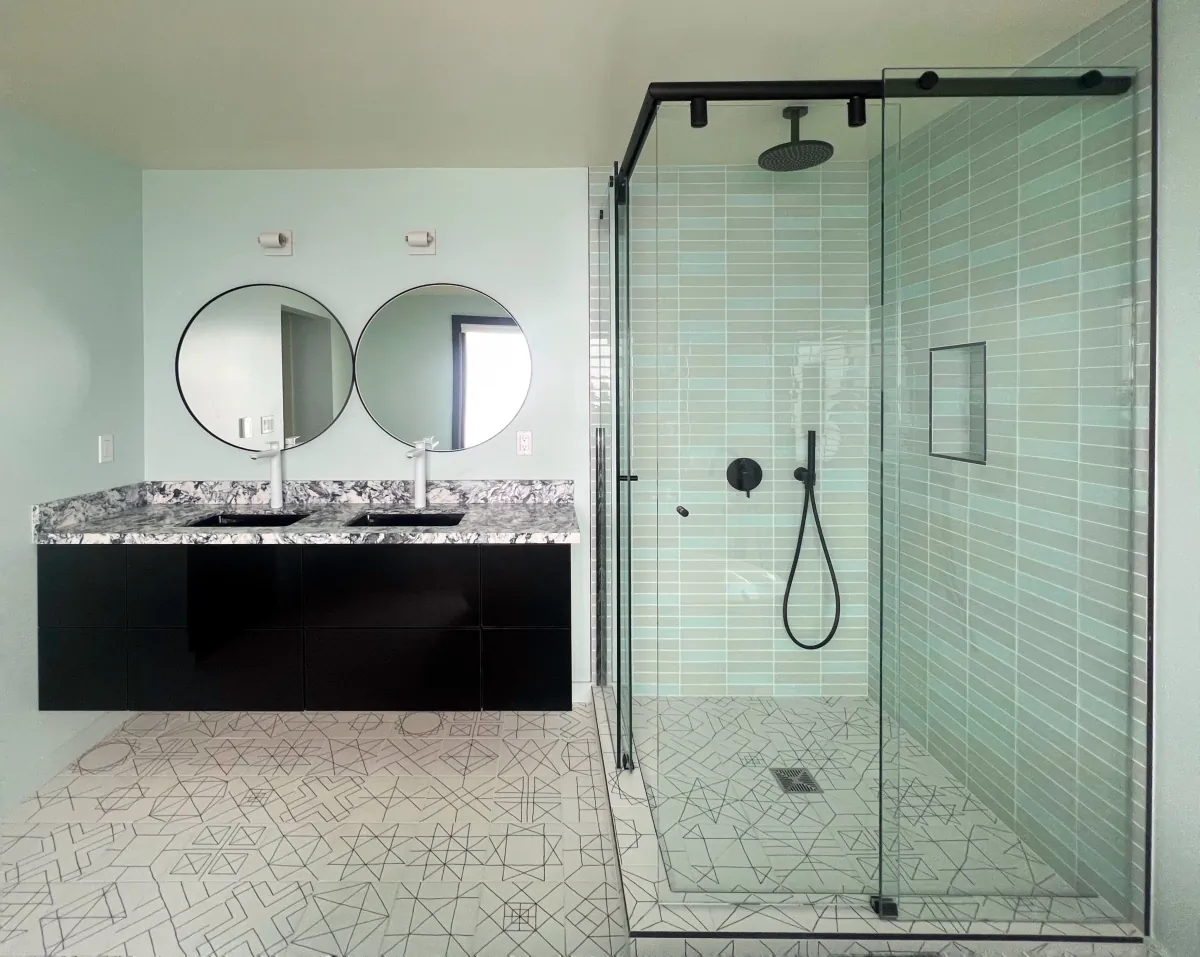
Porcelain/Ceramic Tile
- Strong all-around choice for wet areas when the substrate is flat and properly prepared.
- Matte and lightly textured finishes can feel more secure underfoot than polished tile.
- Large formats reduce grout lines; smaller mosaics perform better on sloped shower zones.
Luxury Vinyl (LVP) And Sheet Vinyl
- Often warmer underfoot and can be faster to install than tile in a floor-only refresh.
- Needs a very smooth, flat substrate; imperfections can telegraph through.
- Sheet vinyl reduces seams; LVP can make spot repairs simpler if damage happens later.
Natural Stone
- High-end look, but it demands sealing and more careful long-term maintenance.
- Choose slip-aware finishes and plan for periodic resealing based on the stone and usage.
Finish Details That Change The Look (And The Cleanup)
- Grout: color and joint width affect how busy the floor looks and how much you notice daily soil.
- Edge trims: clean metal or stone trims prevent chipped edges and make transitions look intentional.
- Caulk vs grout: changes-of-plane typically need flexible detailing so corners stay neat.
Maintenance Tips For Long Life
- Use pH-neutral cleaners for tile and stone; harsh acids can damage grout and some stone finishes.
- Wipe standing water near the shower/tub edge; it reduces mineral buildup and keeps grout looking consistent.
- Use soft pads on furniture-style vanities and avoid dragging items that can scratch.
- Re-caulk any separation early instead of letting water travel behind trim or into joints.
ROI And Resale Priorities
Bathrooms sell homes, but buyers pay for durability more than novelty. Also, Spend on the parts you can’t “see” later—flatness correction, proper underlayment, and water protection at transitions. Additionally, For finishes, stick with timeless colors, clean trim details, and a floor texture that feels safe when wet. In addition, Those choices age well and keep inspection-day questions to a minimum.
Related Upgrades You May Bundle
If you’re already opening the room up, it can be cost-effective to combine bathroom floors with a vanity swap, lighting updates, or a shower refresh so transitions and finishes match. You can also review broader home remodeling priorities on our main site: US Construction & Remodeling Corp..
Timeline And Site Disruption (Typical)
A floor-only refresh can move quickly once materials arrive, but tile work still needs prep and cure time. In addition, Plan for noise during demo, limited bathroom access during key phases, and a short period where the room needs to stay dry and undisturbed so finishes set properly.
Budget Ranges & Timeline (Typical)
- Floor-only replacements often finish in a few working days when the subfloor is in good shape.
- Subfloor leveling/repair can add time because compounds and adhesives need proper drying.
- Full remodels that change the wet area commonly take several weeks due to sequencing and inspections.
- Custom patterns, in-floor heat, and moving fixtures add coordination and time.
Key Decisions That Drive Time And Cost
| Decision | Why it matters | Typical impact |
|---|
| Remove fixtures vs work around | Clean cuts and waterproof detailing | More time, better finish quality |
| Subfloor repair/leveling | Prevents lippage and cracked grout | Can add drying/curing time |
| Tile size and pattern | Layout time and cutting complexity | More complex patterns take longer |
| Radiant heat add-on | Extra electrical planning and layers | Adds steps before tile is set |
| Permit-triggering scope | Inspections and sequencing | Longer overall project window |
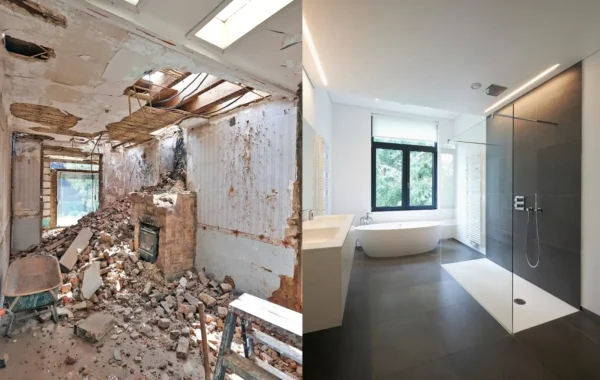
Before/After Snapshot (Hypothetical Example)
Hypothetical example: A homeowner starts with curling vinyl and a soft spot near the toilet. In addition, After demo, the crew finds uneven areas and corrects the substrate so the new finish sits flat. For example, The homeowner chooses matte porcelain tile with a warm-gray grout and a clean metal edge at the threshold. The finished room feels safer when wet, looks more consistent under lighting, and cleans up faster because water doesn’t pool in low spots.
If you’re working around a move-in date or only have one bathroom, call Call so we can talk through sequencing and access.
How To Get Started In Sacramento
Start by deciding whether you’re doing a surface refresh or a remodel that changes plumbing, electrical, or the wet area. Additionally, In Sacramento, permitting and plan review typically run through the City of Sacramento Community Development online portal (Accela Citizen Access), so it helps to confirm requirements early if your scope goes beyond like-for-like replacement. Overall, Outside Sacramento, the same planning steps apply—your local city or county building department will have a similar process.
Sacramento Permitting And Plan Review Notes
- Like-for-like flooring swaps often don’t trigger permits, but layout changes and wet-area rebuilds can.
- If permits apply, plan review and inspection scheduling can affect the overall timeline more than the install itself.
- Keep product specs handy (tile, underlayment, heat system) so submittals are straightforward if requested.
Online Or By Phone
Use online booking when you want the fastest start: request your estimate online. Meanwhile, If you prefer to talk through materials first, call Call.
Trust Checklist For Hiring (No Hype)
- Ask for current licensing and insurance details, and verify them independently.
- Get a written scope that names the exact materials, prep steps, and transitions.
- Clarify who pulls permits when the project changes plumbing, electrical, or structure.
- Agree on communication: daily access, work hours, and how change decisions get approved.
- Verify workmanship at completion: flatness, grout consistency, clean cuts, and tidy sealant lines.
Company Contact
Helpful Links
Frequently Asked Questions
Porcelain tile and properly installed sheet vinyl are two common choices for wet areas because they handle moisture well when the substrate and edges are detailed correctly.
- Tile: durable and long-lasting, especially with a matte/texture that feels secure when wet.
- Sheet vinyl: fewer seams than planks, which can simplify cleanup.
- Key point: the waterproofing and edge details matter as much as the surface material.
Many floor-only projects finish in a few working days once materials are onsite. Subfloor repairs, leveling, custom tile patterns, or added features like radiant heat can extend the schedule.
If your home has only one bathroom, ask your contractor to outline day-by-day access so you can plan around downtime.
Often, a like-for-like floor replacement does not require a permit, but rules vary by jurisdiction and by scope. Permits are more likely when the project changes plumbing, electrical, structural elements, or the wet area assembly.
In Sacramento, many permit steps are handled through the City of Sacramento Community Development online portal (Accela Citizen Access). When in doubt, confirm with your local building department before work starts.
Bathroom floor pricing usually changes based on prep work and complexity, not just the tile you pick.
- Demo and disposal (especially if multiple layers exist)
- Subfloor repair and leveling for flatness
- Water-related detailing at tubs/showers and around penetrations
- Tile size, pattern complexity, and cut count
- Radiant heat systems and electrical coordination
- Fixture removal/reset (toilet, vanity) for cleaner edges
Yes. Electric radiant heat is a common upgrade under tile. It adds comfort, but it also adds steps and coordination.
- Follow the manufacturer’s installation requirements for underlayment and sensors.
- Confirm electrical capacity and whether the scope requires an electrical permit.
- Plan thermostat location early so it doesn’t land behind doors or furniture.
Compare the prep plan and finish details, not just the price per square foot.
- Ask how they verify floor flatness and what they do if the subfloor needs repair.
- Confirm who handles permit steps if the scope changes plumbing/electrical.
- Get a written scope listing materials, trim details, and transitions.
- Verify licensing through the California Contractors State License Board (CSLB) and ask for proof of insurance.
Licensed, insured & trusted local contractor
US Construction & Remodeling Corp.
4424 Freeport Blvd, Sacramento, CA, 95822
Phone: +1 (916) 234-6696
CSLB License #: 1117562 Fully licensed and insured.
View our Google Business Profile