Bathroom waterproofing | waterproof flooring guide
Planning bathroom waterproofing starts at your feet. Waterproof flooring can look great, but it only performs well when the material and installation details match the room’s daily water exposure.
Quick checklist:
- Define the scope and prioritize daily function (shower, storage, ventilation).
- Confirm what trade work is involved (plumbing, electrical, drywall) and the order of work.
- Choose finishes that hold up in wet areas and are easy to clean.
- Collect 2–3 quotes and compare line-by-line (scope, allowances, cleanup, warranty).
- Decide what needs to be ordered first (tile, fixtures, vanity) to keep the schedule moving.
This guide covers practical options for bathrooms across California, including how to plan the scope, what can trigger permits, and how to avoid the “looks finished, leaks later” problems. For a fast recommendation for your home, call Call.
TL;DR: Pick a floor that can handle standing water, plan the details at seams and transitions, and budget for subfloor prep. When the project also touches plumbing, electrical, or layout changes, your local building department may require permits and inspections.
- Map the wet zone (shower/tub, toilet, vanity)
- Choose a “waterproof” material with realistic slip resistance
- Decide how edges, corners, and transitions get sealed
- Confirm subfloor condition and moisture before ordering materials
- Plan thresholds, door clearances, and adjacent-room transitions
- Leave time for cure/dry times (thinset, grout, sealants)
- Ask early whether your scope changes require a permit
Planning, Permits, And Practical Decisions For Bathroom Waterproofing
| Decision | Why it matters | Quick check |
|---|---|---|
| Wet-area finishes | Wet zones need durable, easy-clean surfaces. | Choose materials rated for bathrooms and simple maintenance. |
| Ventilation | Helps prevent humidity and long-term damage. | Confirm fan sizing and vent routing. |
| Layout | Good layout improves daily usability. | Verify clearances and door swings. |
| Budget control | Keeps scope creep from blowing up the price. | Use allowances and a written change-order process. |
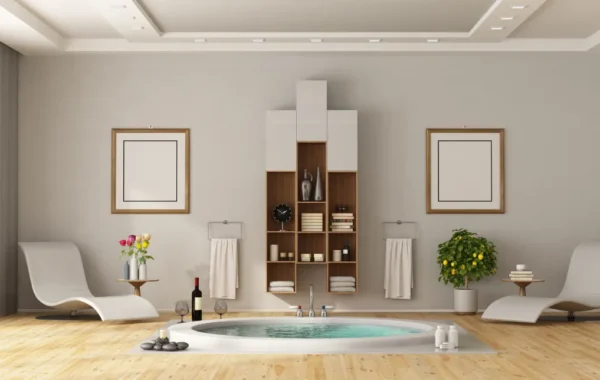
“Waterproof flooring” usually describes the surface material, not the whole system. For this reason, A bathroom stays dry when your floor choice, subfloor prep, and details at the tub/shower edge work together, especially where water sits and where it can sneak under trim.
- Porcelain tile: durable and timeless when the waterproofing details are also executed correctly.
- Large-format tile: fewer grout joints means easier upkeep and fewer places for grime to build up.
- Slip-resistant finishes: prioritize traction in bathrooms, even if the tile looks slightly more matte.
- Luxury vinyl plank (LVP): comfortable underfoot and easy to clean; plan edge sealing and transitions carefully.
- Sheet vinyl: a smart option for minimal seams; consider a coved base detail in splash zones.
- Epoxy/advanced grout options (where appropriate): can reduce maintenance compared to standard cement grout.
- Water-tolerant base and trim: PVC or moisture-resistant trim can outperform MDF in wet rooms.
- Thoughtful thresholds: helps keep water in the bathroom without creating a trip edge.
- Heated floors: adds comfort and can help drying; confirm assembly compatibility before you buy.
- Color strategy: mid-tones hide daily dust and water spotting better than extremes.
- Drain-aware design: for curbless or wet-room concepts, plan slope, drains, and waterproofing as a single package.
Small-Bath Layouts That Protect The Floor
In a compact bathroom, layout decisions change how much water reaches the floor. Meanwhile, A few inches can separate “always damp” from “easy to keep dry.”
- Contain the shower spray line with a properly sized glass panel or curtain.
- Use a wall-hung or floating vanity when feasible so the floor can dry faster.
- Choose a door swing that avoids dragging wet towels across the room.
- Place towel storage within arm’s reach of the shower to reduce drips.
Storage Moves That Keep Water Off The Floor
Storage sounds unrelated to flooring, yet it is one of the easiest ways to reduce puddles and long-term moisture exposure.
- Add a tall linen cabinet or recessed shelves instead of stacking items on the floor.
- Use drawers (not open shelving) to keep toiletries from tipping and leaking.
- Install hooks and towel bars where they’re used, not where they “look balanced.”
- Pick a vanity base that lets you mop and dry underneath.

Planning Checklist (Scope, Materials, Budget) For Bathroom Waterproofing
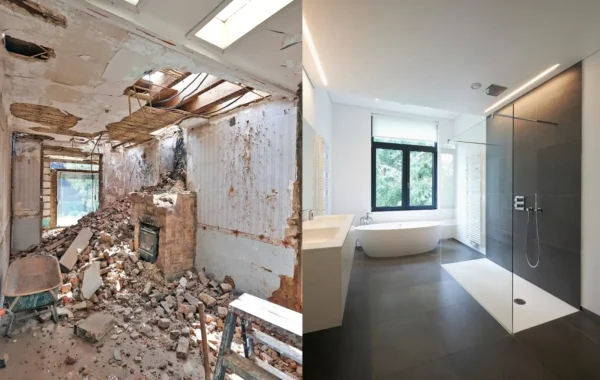
A waterproof floor project can be as simple as replacing finish flooring, or it can be part of a full bathroom refresh. Overall, Clarity on scope saves time because it determines prep work, material quantities, and whether other trades are involved.
Scope And Prep Checklist
- Confirm what stays: vanity, toilet, baseboards, shower pan, and drywall edges.
- Decide how far the new floor runs (to the tub face, under the vanity, into a closet).
- Inspect the subfloor for soft spots, squeaks, uneven areas, and past leak staining.
- Plan for moisture testing or mitigation if the subfloor shows signs of chronic dampness.
- Select underlayment/backer based on manufacturer requirements and floor height.
- Choose transition details to adjacent rooms (height, reducer, threshold, door undercut).
- Pick grout/caulk/sealant colors early so finishes stay coordinated.
What Actually Changes Performance
Two bathrooms can use the same “waterproof” product and perform very differently. Additionally, Installation details (edge sealing, movement joints, and how the floor meets the shower/tub) often matter more than the label on the box. In other words, bathroom waterproofing is a system, not a single product.
| Decision | Common options | Typical cost/time drivers | Best fit |
|---|---|---|---|
| Finish flooring | Porcelain tile, LVP, sheet vinyl | Demo, floor leveling, material price, cut complexity | Most bathroom floors |
| Underlayment | Cement board, uncoupling membrane, approved underlayment | Height changes, fastening patterns, compatibility | Tile or uneven subfloors |
| Waterproofing details | Membrane systems, sealed seams, edge protection | Corner/penetration detailing, cure times, inspections | High-splash or shower-adjacent areas |
| Transitions | Thresholds, reducers, caulked edges | Custom trim, door work, height matching | Bathrooms next to wood/carpet |
Resale And ROI Priorities
Water damage concerns buyers, so a clean, well-detailed bathroom floor can be a quiet value add. As a result, Neutral finishes, consistent transitions, and easy maintenance usually beat trendy looks that show wear quickly.
- Choose finishes that look good under bright vanity lighting and daylight.
- Avoid overly complex grout patterns if you want lower upkeep and broader appeal.
- Keep product information and care notes for future owners.
Related Services And Materials
If waterproof flooring is part of a broader bathroom remodel, shower upgrade, or vanity replacement, plan the floor system early so plumbing fixtures, trim, and tile lines land cleanly. Also, You can browse our home remodeling services for more project types and planning guidance.

Permits And Inspections (General)
US Construction & Remodeling Corp. In addition, helps homeowners plan waterproof flooring with the bigger picture in mind, including bathroom waterproofing details, clean transitions, and a scope that aligns with local requirements. Based in Sacramento, we also work with homeowners across California; when a project goes beyond a simple finish-floor swap, we can help you confirm whether permits apply and coordinate the work so inspections don’t stall the schedule.
Get a quick consult: call Call or request an estimate online.
When Permits May Come Into Play
In many California jurisdictions, replacing the finish flooring alone may not trigger a permit. For example, Permits become more likely when the job changes building systems or life-safety details.
- Moving or adding plumbing (showers, tubs, toilet location, new drains)
- Electrical changes (new circuits, heated floors, relocating lighting or receptacles)
- Structural changes (wall moves, framing repairs, significant subfloor replacement)
- New shower assemblies or major wet-area waterproofing changes
What Inspections Typically Look For
Inspection checkpoints vary by scope and jurisdiction, yet the themes stay consistent: proper prep, approved assemblies, and safe clearances.
- Correct underlayment/backer installation and fastening
- Waterproofing continuity at corners, penetrations, and transitions
- Proper slope and drainage where applicable
- Safe electrical protections in wet locations
Trust Checklist Before Work Starts
You don’t need contractor jargon, but you do need clear documentation and accountability.
- Ask for a written scope that matches your goals and the product requirements.
- Confirm who will pull permits if they’re required for your scope.
- Request manufacturer installation guidelines for the specific floor system you choose.
- Set communication expectations (who you call, how changes are approved, and how schedule updates happen).
Frequently Asked Questions
Not by itself. Waterproof flooring describes the finish surface, while bathroom waterproofing is the full system: subfloor prep, approved assemblies (when needed), sealed transitions, and proper detailing at tubs, showers, and walls.
If you’re changing wet-area details, plan the waterproofing approach before you finalize the finish flooring.
It depends on scope and jurisdiction. A like-for-like finish-floor replacement may not require a permit in many areas. Permits are more common when the job includes plumbing, electrical, structural repairs, or major wet-area changes.
When in doubt, confirm with your local building department before demo.
Porcelain tile, sheet vinyl, and many LVP systems are common choices for bathrooms. The best option depends on your goals (traction, maintenance, appearance) and the condition of the subfloor.
- Tile: great durability, but demands correct prep and detailing.
- Sheet vinyl: minimal seams and easy cleanup.
- LVP: comfortable underfoot, but transitions and edges need careful planning.
The biggest cost drivers usually come from what’s under the floor and how complex the detailing is.
- Subfloor repairs, leveling, and moisture mitigation
- Material choice (tile vs vinyl vs specialty finishes)
- Cut complexity around tubs, toilets, and tight corners
- Waterproofing details, transitions, and trim work
Timeline depends on material, prep, and cure times. A simple floor replacement can take a few days, while tile and wet-area detailing can take longer due to setting and curing.
If permits and inspections apply, scheduling can add time, especially during busy seasons.
Look for clarity and accountability rather than vague promises.
- Ask for a written scope that matches the selected product requirements
- Confirm how subfloor issues are handled if they’re discovered during demo
- Request the specific installation guidelines for the chosen floor system
- Verify licensing through the CSLB and ask how permits are handled when required