
Emergency Roof Leak Repair in California: A Practical Guide
Water coming through your ceiling isn’t just annoying—it can damage insulation, drywall, and electrical fast. In that moment, emergency roof leak repair is about controlling water now and identifying the real entry point so the fix doesn’t fail in the next storm.
Quick checklist:
- Confirm the scope: repair, partial replacement, or a full reroof.
- Pick a material system and verify underlayment, flashing, and ventilation details.
- Clarify tear-off vs overlay and what happens if decking damage is found.
- Compare 2–3 itemized bids (materials, disposal, permits, warranty).
- Schedule around weather and confirm daily cleanup and protection.
- Do a final walkthrough: flashing, vents, and warranty documentation.
TL;DR: Contain the leak indoors, document what you see, and get the roof inspected as soon as conditions are safe. Many situations need two phases: a temporary stabilization step, followed by a permanent repair once the area is dry. If you want a clear schedule, start with a short planning call focused on timeline and scope.
- Move valuables and cover flooring near the drip.
- Catch water with a bucket; place towels where splashing happens.
- Take photos of interior staining and any visible roof damage from the ground.
- Write down when the leak shows up (steady rain, wind-driven rain, or after HVAC use).
- Keep attic access clear if you have one; avoid stepping on ceiling drywall.
- Skip climbing onto a wet or steep roof—safety comes first.
If water is actively entering, call +1 (916) 234-6696 to talk through immediate containment and likely timing.
What Changes The Experience The Most For Emergency Roof Leak Repair
| Decision | Why it matters | Quick check |
|---|---|---|
| Material system | Affects lifespan, cost, and appearance. | Confirm shingle/tile type, underlayment, and warranty. |
| Flashing & penetrations | Most leaks start at edges and penetrations. | Specify flashing at chimneys, vents, and valleys. |
| Ventilation | Controls heat/moisture and protects decking. | Confirm intake/exhaust balance and vent types. |
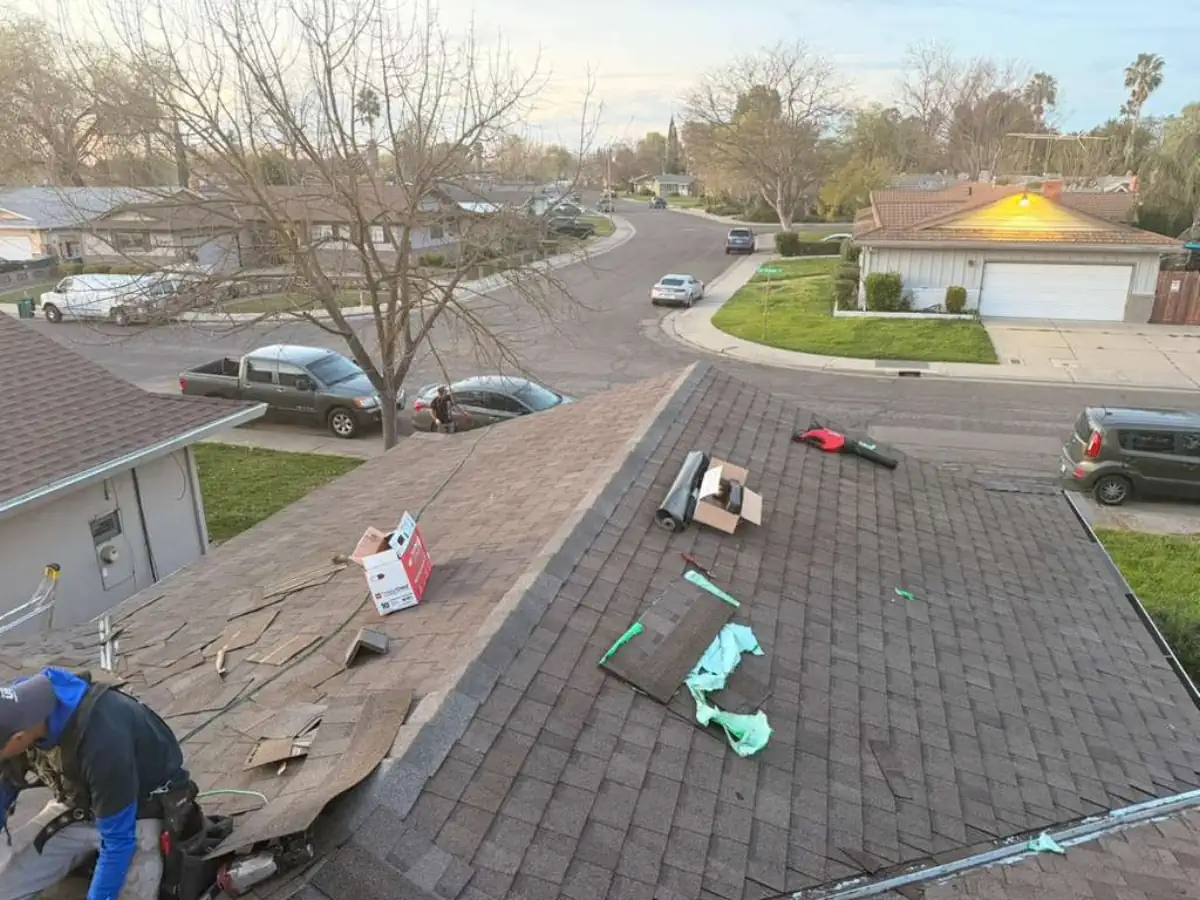
| Tear-off & decking | Hidden damage can change cost and timeline. | Include an allowance and photo documentation. |
When a leak hits, speed matters, but accuracy matters too. A “quick patch” that misses the source can also send water into a new path, which makes the next leak harder to diagnose.
What Usually Determines The Scope
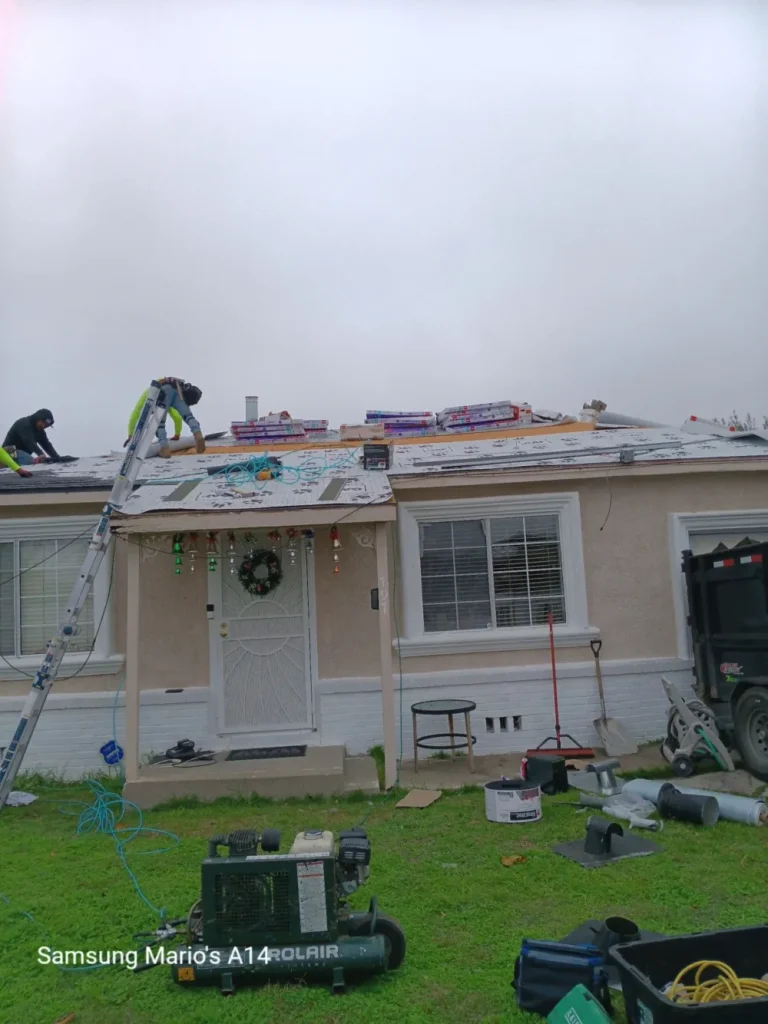
- Roof material and condition: asphalt shingles, tile, metal, and low-slope roofs fail in different ways.
- Where water shows up indoors: the stain may be several feet from the roof entry point.
- Weather and safety: wet surfaces, steep pitches, and high roofs can delay access.
- Penetrations and transitions: vents, chimneys, skylights, walls, and valleys concentrate water.
- Hidden damage: saturated decking or insulation can expand the repair area.
- Material matching: some profiles/colors need lead time to source.
- Access inside the home: attic entry and clear work zones speed up diagnosis.
When It’s Truly An Emergency
These situations usually justify urgent action because the risk of interior damage rises quickly:
- Active dripping or running water indoors
- Bulging drywall or a spreading ceiling stain
- Water near lights, outlets, or the electrical panel
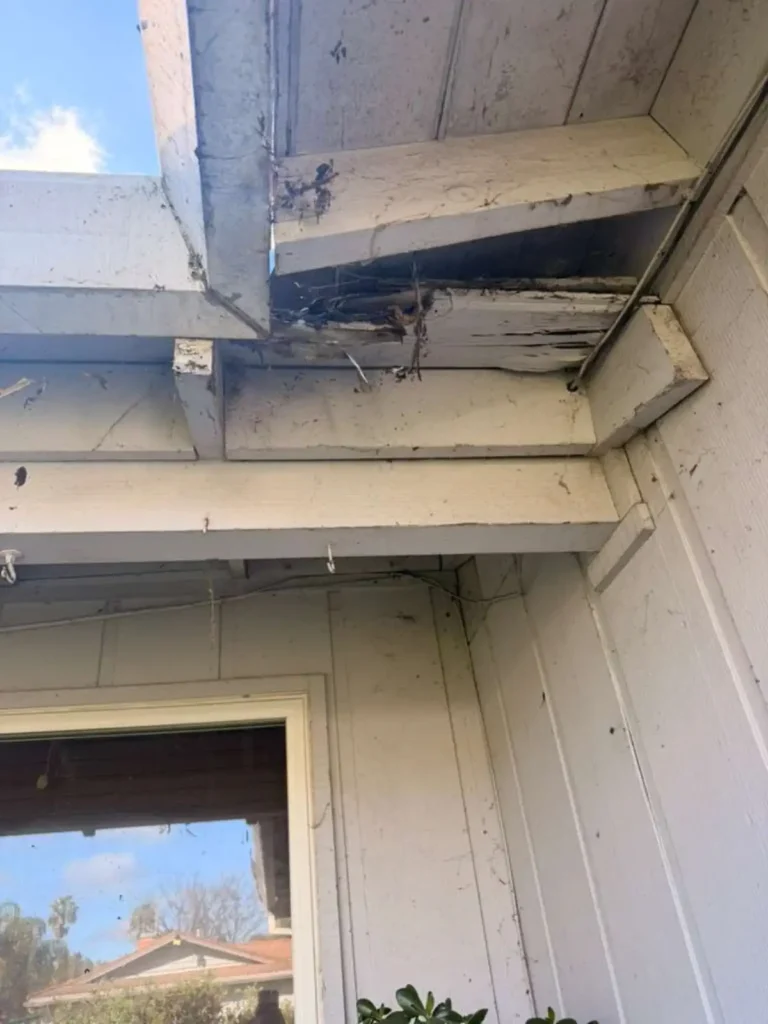
- Visible roof openings, missing materials, or damaged flashing
Even if the leak stops when the rain stops, don’t ignore it. Additionally, Water can continue to wick through insulation or framing, and mold can start where you can’t see it.
Two Phases That Keep You In Control
Most emergency roof leak repair work breaks into a short-term stabilization step and a permanent fix. Overall, Stabilization might include a tarp, temporary water diversion, or targeted sealing where appropriate. For example, After that, a durable repair typically involves restoring the underlayment and flashing details—not just the surface layer.
Layout And Function Improvements
Roof leaks repeat when the roof’s geometry funnels water into the same weak spot. Also, A smart repair looks at the surrounding layout so water sheds the way it should.
Map The Water Path Before Repairs
Inside the attic (if accessible and safe), look for darkened wood, wet insulation, or water trails on framing. In addition, On the roof, pay attention to valleys, wall-to-roof transitions, skylights, and plumbing vents. Overall, Those areas handle concentrated flow, so small defects show up fast.
Tight-Access And Small Roof Areas
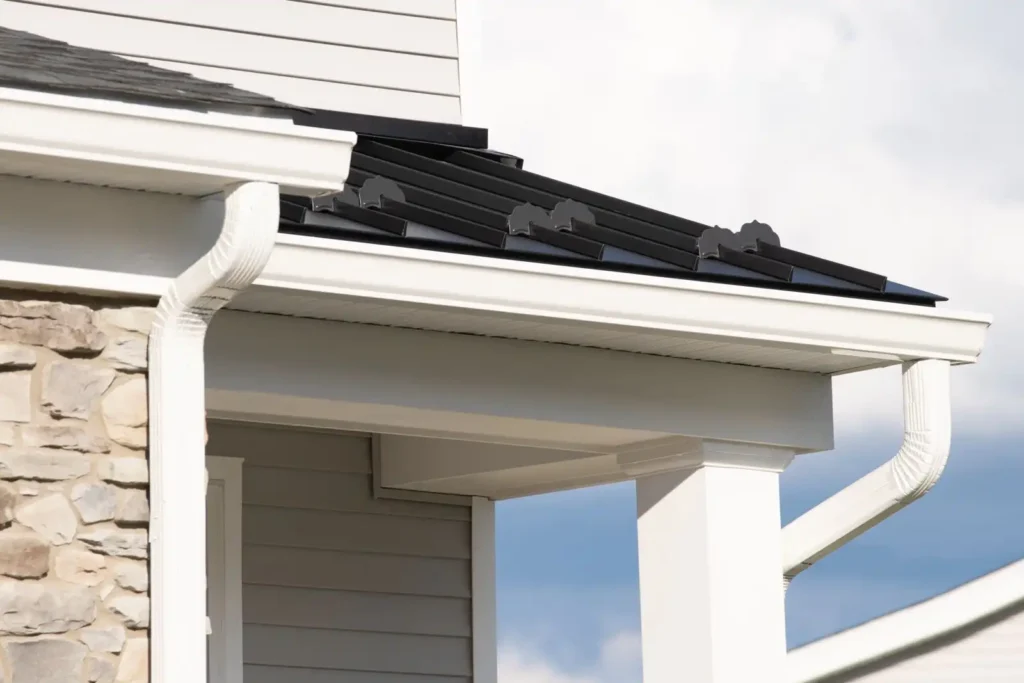
Leaks over porches, bump-outs, or small low-slope sections can be tricky because access is limited and water can travel laterally. For example, In those cases, the best “layout upgrade” is often better flashing integration at edges and transitions, plus clean drainage paths so water doesn’t back up under materials.
If you suspect a gutter overflow contributes to the problem, note where water spills during heavy rain. As a result, That observation helps target the fix without guessing.

Materials And Finish Options For Emergency Roof Leak Repair
A long-lasting repair depends on more than the visible roof covering. For this reason, In practice, underlayment and flashing details do most of the waterproofing at joints, edges, and penetrations.
Material Choices That Actually Matter
- Flashing metal: durable flashing at walls, chimneys, and valleys resists repeated wet/dry cycles. Meanwhile, Compatibility matters; mixed metals can corrode over time.
- Underlayment: synthetic underlayments offer strong tear resistance, while felt can work in some applications. Also, The right choice depends on roof type and manufacturer requirements.
- Pipe boots and vent seals: cracked boots and loose collars are common leak points. As a result, Upgrading the seal detail often stops recurring leaks.
- Sealants: sealant can support a repair, but it shouldn’t be the only waterproofing strategy at high-flow areas.
- Fasteners and exposed penetrations: backed-out nails or deteriorated washers can let water in; the fix is usually mechanical, not cosmetic.
Blending The “Finish” So It Looks Intentional
For many homes, the goal is to repair the leak without leaving an obvious patch. For example, Material matching can influence timing because certain shingle or tile profiles may need lead time. When an exact match isn’t available, you can sometimes limit visibility by concentrating replacements on a single plane or ridge line.
Cost Drivers + Timeline (Typical)
There isn’t one price for a “roof leak,” because the interior symptom can come from multiple roof sources. For this reason, The fastest way to control both cost and schedule is a clear scope: where the water enters, what materials are affected, and what conditions must be met to complete a permanent repair.
Key Decisions In A Scannable View
| What you’re seeing | What it can mean | What affects timeline |
|---|---|---|
| Drip near a vent | Vent boot or flashing detail | Roof access and dry conditions for a durable seal |
| Stain below a valley | Valley flashing or underlayment issue | Extent of material lift needed to inspect |
| Leak after wind-driven rain | Edge flashing, wall transition, or missing material | Material matching and safe ladder placement |
| Water around a skylight | Skylight flashing kit or surrounding shingles | Manufacturer-specific parts and proper integration |
Budget Ranges & Timeline (Typical)
- Initial triage: a phone call and photos can often narrow the likely source and urgency.
- Stabilization: when conditions allow, temporary protection can stop further interior damage while you plan the permanent fix.
- Permanent repair: lasting repairs require dry surfaces and enough time to properly integrate flashing and underlayment.
- Interior follow-up: drying and minor drywall/paint work may come after the roof is watertight again.
What Typically Drives Cost (Without Guessing Numbers)
- Roof height, pitch, and safe access requirements
- Roof type (shingle, tile, metal, low-slope) and detail complexity
- How far water traveled before it showed indoors
- Decking or framing damage discovered during inspection
- Material matching needs and lead times
What Buyers (And Appraisers) Care About
Stopping a leak protects resale value by preventing hidden damage. Also, Equally important, documentation helps you show the issue was corrected rather than covered up.
- Keep photos of the affected area and the completed repair.
- Save the written scope and any warranty information.
- If the work triggers permits in your jurisdiction, keep the final inspection record with your home file.
Hypothetical Before-And-After Scenario
Hypothetical example: A homeowner notices a ceiling stain that grows during heavy rain. For this reason, An inspection finds deteriorated flashing at a wall transition, plus a small underlayment tear. The immediate step is temporary protection to stop interior damage; the permanent fix replaces the flashing detail and restores the underlayment integration. Afterward, the homeowner monitors the next storm, then repairs the drywall once the roof stays dry.
How To Prepare Your Home
Preparation reduces time on-site and protects your interior while the crew works. It also helps the inspection move quickly from “where is the drip” to “why is water getting in.”
Before The Visit
- Move furniture away from the leak area and clear a path for ladders.
- Provide attic access if available; point out the closest ceiling stain or wall blistering.
- Secure pets and plan for noise during roof access.
- Share any recent roof work history, even if it was a small patch.
During And Right After The Repair
- Ask for photo documentation of the source and the repaired detail.
- Confirm whether a controlled water test makes sense for your roof type.
- Wait to repaint or close drywall until the area fully dries.
Maintenance After The Fix
- Keep gutters and valleys clear so water doesn’t back up under materials.
- After major storms, look for lifted shingles, displaced tiles, or bent flashing from the ground.
- Watch the original stain area for any new darkening; early detection keeps repairs smaller.
- Schedule periodic roof checkups so small seal and flashing issues don’t become emergencies.

Next Steps For Sacramento
US Construction & Remodeling Corp. For example, helps Sacramento homeowners get from an active drip to a clear repair plan—fast. We start with leak containment, then inspect and provide a written scope so you know timing and options.
Book a timeline planning call to confirm availability, temporary protection options, and what a durable repair is likely to involve.
If you prefer to talk right away, call +1 (916) 234-6696. In addition, If you’re elsewhere in California, the same approach applies; the permit portal just changes by jurisdiction.
Permits And City Coordination (Sacramento)
Some roof work is simple repair, while other scopes can trigger plan review or permits. In addition, In Sacramento, permitting and plan review typically run through the City of Sacramento Community Development online portal (Accela Citizen Access) for applications, payments, and status tracking. If your scope crosses into permit territory, confirm requirements based on your address and the exact work planned.
Trust And Accountability Checklist
- Licensing and insurance: ask for current documentation before work starts; a legitimate contractor can provide it.
- Clear scope: expect a written description of the leak source, the repair approach, and what’s excluded.
- Photos: request before/after photos of the repaired detail, especially on steep or high roofs.
- Permit guidance: if the scope requires permits, clarify who pulls them and how inspections will be scheduled.
- Communication: confirm how schedule changes are handled when weather affects roof access.
Helpful Links
Frequently Asked Questions
Timing depends on roof access and weather, but many leaks can be stabilized quickly once conditions are safe to work.
- Triage: share photos and symptoms to narrow likely entry points.
- Stabilize: temporary protection helps prevent additional interior damage.
- Repair: the durable fix follows when surfaces are dry and the correct materials are on hand.
If the leak is active right now, call +1 (916) 234-6696 to talk through urgency and likely timing.
Cost usually tracks complexity and access more than the size of the stain.
- Roof height, pitch, and safety setup
- Roof type and flashing detail complexity
- How far water traveled before it showed indoors
- Hidden damage (decking, insulation) found during inspection
- Material matching and lead times
It depends on the scope and local building department. Many straightforward repairs don’t require a permit, while larger scopes (or work that changes structural elements) may.
A good contractor will flag permit considerations early and explain who handles submittals and inspections if they’re needed.
A tarp is typically a temporary stabilization step. It can reduce interior damage while you plan a permanent repair, especially when weather or material lead times slow the final work.
For a durable result, the permanent fix usually restores flashing and underlayment integration at the true entry point.
Many recurring leaks start at transitions rather than in the middle of a roof plane.
- Flashing at walls, chimneys, and valleys
- Vent pipe boots and collars
- Skylight flashing details
- Exposed fasteners and deteriorated washers (when present)
- Underlayment damage beneath otherwise “okay” shingles or tiles
Look for clear communication and verifiable documentation, not vague promises.
- Ask for a written scope that identifies the leak source and repair approach.
- Request before/after photos of the repaired detail.
- Confirm how pricing changes if hidden damage is discovered.
- Ask who handles permits if the scope requires them.
- Verify licensing and insurance documentation before work starts.
Licensed, insured & trusted local contractor
US Construction & Remodeling Corp.
9821 Business Park Dr, Sacramento, CA, 95827
Phone: +1 (916) 234-6696
CSLB License #: 1117562 Fully licensed and insured.
Service info for Sacramento
For the complete overview of process and planning in Sacramento, visit Roofing Remodeling (Landing Page).


