Skip links

James Hardie Siding Contractor Hiring Checklist (Homeowner Guide)

Replacing old cladding is a major exterior investment, and the right james hardie siding contractor helps you control cost, moisture protection, and curb appeal. Use the checklist below to compare bids, ask smarter questions, and keep the work moving once the crew is on site.

Quick checklist:

  • Define the scope and your must-have outcome (function, budget, timeline).
  • Confirm what trade work is involved (electrical, plumbing, drywall) and the order of work.
  • Finalize measurements and key selections before ordering long-lead materials.
  • Verify license/insurance where required, and compare bids line-by-line (allowances, exclusions, change orders).
  • Create a simple schedule and pre-order the items that most often cause delays.

TL;DR: Get multiple written bids that spell out tear-off, housewrap, flashing, trim, and cleanup. Then lock in material choices and a realistic schedule before you sign. To talk through your home and get a straightforward estimate, call +1 (916) 234-6696.

  • Verify licensing and insurance, plus references for similar fiber-cement jobs
  • Compare scopes line-by-line (demo, rot repair, wrap, flashing, trim, paint)
  • Confirm who handles permits and inspections if your city requires them
  • Decide product style, color, trim profile, and vent/light locations early
  • Ask how the crew will protect landscaping, windows, and walkways
  • Get change orders and warranty terms in writing before work starts

Planning James Hardie Siding Contractor: A Homeowner Checklist

DecisionWhy it mattersQuick check
ScopeDefines what is included and prevents surprises.Write a line-item scope and allowances list.
Site constraintsHidden conditions can change the plan.Check access, wiring/plumbing, and existing surfaces.
SelectionsLong-lead items can drive the schedule.Confirm availability before demo starts.
PermitsSome scopes require approvals and inspections.Ask your city/county what applies to your project.

A siding project can look simple until you compare bids. In addition, One contractor includes new housewrap and flashing, another assumes you will keep existing trim, and a third only prices what you can see from the street. For this reason, Planning up front keeps pricing honest and helps you avoid mid-project surprises.

This guide is also for homeowners who want a durable exterior upgrade (lap, panel, or shingle-style fiber cement) and want to hire the right team the first time.

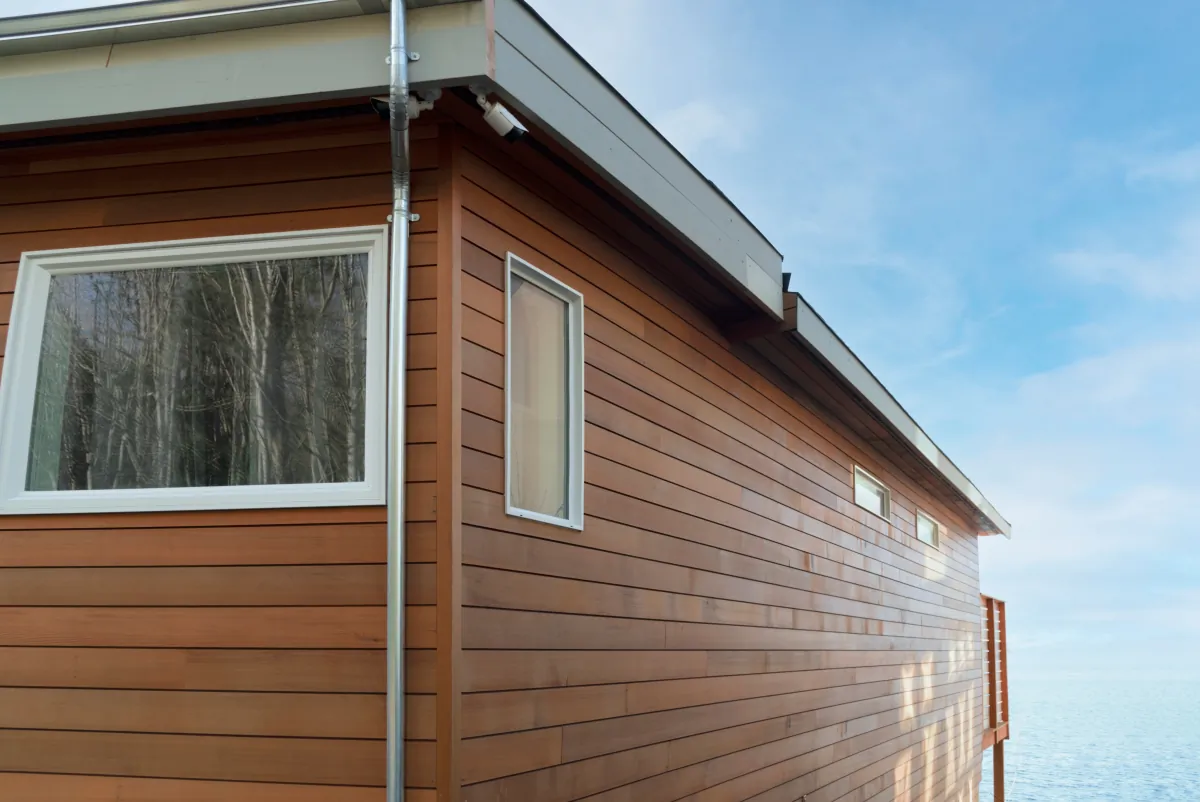
When you hire a james hardie siding contractor, you are paying for details: straight courses, clean trim lines, and water management behind the boards.

Checklist: Define The Scope Before You Request Bids

  • List every wall to be re-sided (front-only vs full wrap) and note second-story access
  • Decide whether you want full tear-off or a limited overlay, then ask what fits your home
  • Flag known leak zones: windows/doors, decks, roof-to-wall intersections, and chimney areas
  • Pick a finish direction (lap, panel, shingle look) so every bidder prices the same style
  • Note add-ons that change scope: soffit/fascia, gutters, exterior paint, new lighting, or new vents
  • Set expectations for driveway use, dumpster placement, and daily cleanup

Questions To Ask When Interviewing Contractors

Good contractors answer with specifics, not vague promises. Additionally, they can explain how they handle hidden damage without derailing the budget.

  • Who is the on-site lead each day, and will you use employees or subcontractors?
  • How do you price rot or sheathing repairs discovered after removal?
  • How will you flash windows/doors and roof-to-wall transitions, including kickout flashing where needed?
  • Which weather-resistive barrier and tape system are included in your base bid?
  • How will you cut fiber cement (dust control, cleanup, and protection for plants and neighbors)?
  • What workmanship warranty do you provide, and what closeout documents will I receive?

Quick Bid Comparison Checklist

  • Written scope that names the product type, trim boards, corner details, and finish approach
  • Clear line item for tear-off and disposal (including nails and debris pickup)
  • Plan for sheathing inspection and repairs, with pricing rules for added materials/labor
  • Flashing and water management included (windows, doors, penetrations, and roof tie-ins)
  • Site protection plan (landscaping, windows, walkways) and daily cleanup expectations
  • Payment schedule tied to milestones, plus a written change-order method

Common Planning Mistakes To Avoid

  • Choosing the lowest number when the scopes do not match
  • Leaving trim, corners, and window details undefined (that is where costs jump later)
  • Skipping a walkthrough of penetrations (hose bibs, vents, lights) before materials are cut
  • Paying too much up front instead of linking payments to completed milestones
  • Assuming old flashing will work with a new siding system
fiber cement lap siding

Permits And Code Considerations

Many re-siding projects require a building permit, especially when you remove existing cladding or replace sheathing. Also, Even when your local department does not require a permit for your scope, code-driven details still matter because they protect the wall assembly from water and wind.

Before you sign, make sure the bid states who handles permits and inspections (if required) and how the contractor will keep the home weather-tight during the process.

Permit And Compliance Checklist For Your Bid

  • Clarify whether the contractor will pull the permit in their name when needed, and whether fees are included or excluded
  • Ask what inspections are expected and who schedules them
  • Confirm how the crew protects openings at the end of each workday, especially if weather turns
  • If the home has older paint, ask what lead-safe practices will be used during removal and cleanup
  • Get disposal and dust-control steps in writing (bagging, sweeping, and haul-away)

If you are comparing a james hardie siding contractor bid to a generic siding bid, look for line items that address housewrap, flashing, trim details, and fastening patterns—not just ‘install siding’.

Timeline And Scheduling

A realistic timeline keeps the project calm and protects your home. For example, Instead of relying on a single start date, ask for a phase-by-phase schedule and how the contractor handles rain delays, material lead times, and unexpected repairs.

Typical Phases And Approximate Durations

  • Pre-start (3–14 days): finalize material selections, confirm access, order materials, and line up a start window
  • Site setup (1 day): protect landscaping, set staging, and place dumpster or haul-away plan
  • Tear-off and inspection (1–4 days): remove old siding, assess sheathing, and identify repairs
  • Repairs and prep (1–5 days): fix rot/sheathing, adjust flashing, install weather-resistive barrier, and prep openings
  • Siding and trim install (5–12 days): install boards/panels, corners, trim, and penetrations
  • Finish and cleanup (1–4 days): caulk/paint as needed, touch-ups, cleanup, and punch list

Homes with multiple stories, lots of windows, or repair needs can take longer. On the other hand, a straightforward single-story wrap can move quickly when materials are on site.

DecisionWhat it changesOften affects
Full tear-off vs partial overlayAccess to sheathing and flashingBudget, inspection scope
Trim package (minimal vs upgraded)Labor time and finish lookCost, curb appeal
Rot/sheathing repairsFraming and wall prepSchedule variability
Finish approach (factory vs field)Steps completed on siteTimeline, maintenance plan

Small-Space Access And Staging (Tight Side Yards)

Narrow side yards, small driveways, and dense landscaping can slow a siding job if no one plans for them. Overall, A good contractor will walk the property with you and map out staging, walk paths, and daily cleanup so your home stays usable.

  • Identify a keep-clear path for daily use (for example, a side gate you use to reach a small kitchen patio or trash bins)
  • Pick staging spots that protect sprinklers, plants, and hardscape while still keeping materials close to the work
  • Plan for ladder/scaffold placement so crews do not lean on gutters or crush landscaping
  • Confirm where the dumpster or trailer will sit so it does not block your garage or street access for days

How To Choose Materials And Trades

Material choices drive both price and appearance. Therefore, you will get the fairest comparison when every bidder prices the same product family, trim thickness, and finish approach.

Material Decisions To Lock In Early

  • Profile and look: lap, vertical panel, or shingle-style accents
  • Exposure and layout: reveal size and where you want clean breaks (corners, band boards, and transitions)
  • Trim plan: corner boards, window/door trim, fascia, and soffit details
  • Water management: housewrap type, flashing approach, and how penetrations will be sealed
  • Finish plan: factory finish vs site-painted, plus touch-up expectations
  • Color and sheen: confirm samples in daylight, then place the order

Trades That Often Tie In

  • Gutters/downspouts: re-hanging or replacement after trim/fascia changes
  • Windows/doors: flashing integration, trim changes, or future replacement planning
  • Electrical/low voltage: relocating lights, cameras, or outlets that sit on the siding plane
  • Vents and penetrations: re-flashing exhaust vents and confirming clearances
  • Exterior paint: coordinating color across trim, doors, and other exterior elements

Ask each contractor to note what they will coordinate and what they expect you to handle. Meanwhile, That way, you avoid delays when a trade needs to move a light, vent, or downspout.

fiber cement lap siding

Final Walkthrough: What To Verify

When the last board goes up, do a walkthrough while ladders and touch-up supplies are still on site. This is also the right moment to confirm that the contract scope matches what you see on the walls.

Before you make the final payment, walk the home with your james hardie siding contractor and write down any punch-list items you want resolved.

Walkthrough Checklist

  • Courses look straight and consistent, including around windows and doors
  • Trim lines are clean, with tight corners and even reveals
  • Caulk joints are neat and limited to the appropriate locations (not smeared as a cover-up)
  • Flashing is installed at key transitions (roof-to-wall, deck intersections, and horizontal breaks)
  • All penetrations are sealed and look intentional (lights, vents, hose bibs, outlets)
  • All debris is removed, magnets are used for nails, and landscaping is left tidy

Closeout Documents To Request

  • Final invoice and a copy of the signed scope (including any change orders)
  • Warranty information for workmanship and the installed materials
  • Paint/finish details, including color names/codes if applicable
  • Permit sign-off documentation when a permit was pulled

Sacramento-Area Service And Local Permitting

US Construction & Remodeling Corp. Additionally, serves Sacramento and surrounding markets across California. Meanwhile, If your project is in Sacramento, permitting and plan review typically run through the City of Sacramento Community Development portal (Accela Citizen Access) for online applications, payments, and status tracking.

Call +1 (916) 234-6696 to talk through your exterior goals, or schedule a free estimate online. As a result, We will help you clarify scope, compare bids, and set a realistic construction window before work begins.

Helpful Links

Licensed, insured & trusted local contractor

US Construction & Remodeling Corp.
9821 Business Park Dr, Sacramento, CA, 95827
Phone: +1 (916) 234-6696

CSLB License #: 1117562 Fully licensed and insured.

View our Google Business Profile

Leave a comment

This website uses cookies to improve your web experience.
Explore
Drag